


The Ultimate Guide to Crop PNG Like a Pro
In the digital era, visual content reigns supreme. Whether you are building a website, crafting a social media campaign, or designing a printable brochure, the quality and composition of your visuals dictate how your audience engages with your brand. To crop PNG files means to remove unwanted outer areas from a photographic or illustrated picture. The process consists of the removal of some of the peripheral areas of a photo to remove extraneous trash from the picture, to improve its framing, to change the aspect ratio, or to accentuate or isolate the subject matter from its background.
When you crop a PNG, you are essentially redefining its narrative. A wide landscape shot tells a story of vastness and environment. But if you take that same photo and crop the PNG to focus solely on a lonely cabin in the distance, the story suddenly shifts to isolation, intimacy, and focus. This narrative control is why learning how to properly crop a PNG is considered one of the most fundamental yet powerful tools in digital photography and graphic design.
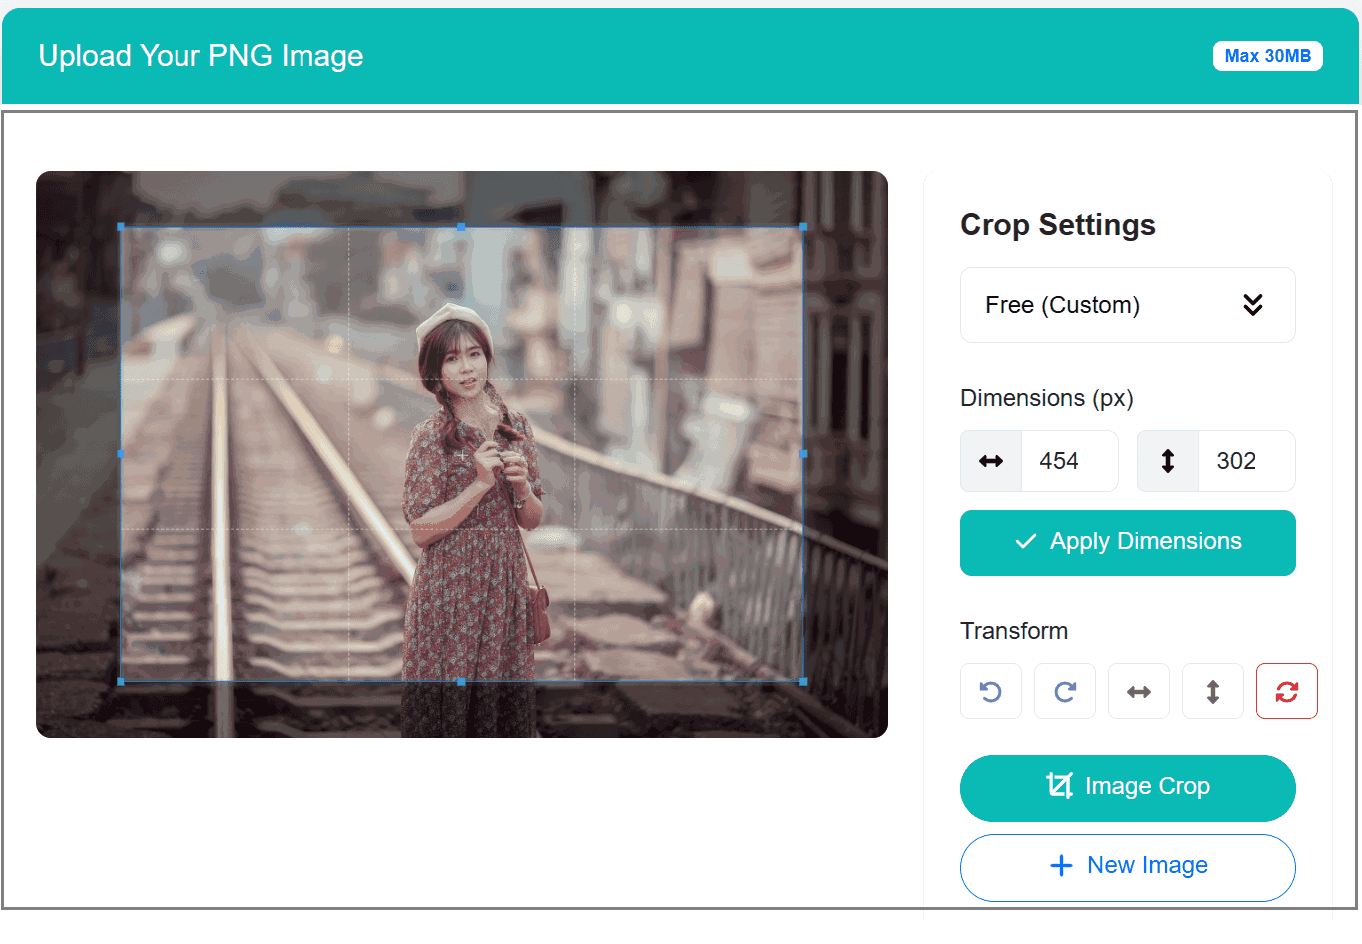
Our sophisticated, responsive tool above allows you to crop PNG files instantly right in your browser. With support for up to 10 files simultaneously and an allowance of 30MB per file, you no longer need heavy, expensive desktop software to achieve professional composition.
Core Principles: How to Crop PNG for Better Composition
Cropping is not just about making a picture smaller to fit a specific dimension; it is an art form driven by established compositional rules. When you decide to crop PNG boundaries, keep the following timeless principles in mind:
1. The Rule of Thirds
The Rule of Thirds is perhaps the most famous compositional guideline in visual arts. Imagine dividing your photo into nine equal segments by two vertical and two horizontal lines. When you crop PNG dimensions, aim to place the most important elements of your scene along these lines, or at the points where they intersect. Most modern crop tools—including ours—provide a grid overlay to help you align your subjects perfectly according to the Rule of Thirds. This technique creates more tension, energy, and interest in the composition than simply centering the subject.
2. Removing Distractions
Often, a photograph captures more than just the intended subject. A beautiful portrait might be ruined by a bright, distracting streetlamp in the corner of the frame, or a stray hand from a passerby. The most practical reason to crop PNG edges is to eliminate these photobombs and visual clutter. By cropping out the noise, you force the viewer's eye exactly where you want it to go.
3. Leaving Room to Breathe (Lead Room)
If your subject is looking in a specific direction, or if an object (like a car or an athlete) is moving, it is visually pleasing to leave space in front of them. This is known as "lead room" or "looking room." When you crop PNG borders tightly around a subject's face while they are looking off-camera, it can create a claustrophobic feeling. Adjust your crop box to give the subject space to look into, balancing the visual weight of the frame.
4. Avoiding Cropping at the Joints
When you crop PNG files containing people, a golden rule of portrait photography is to avoid amputating limbs at the joints. Cropping precisely at the neck, elbows, knees, or ankles looks awkward and unnatural. Instead, crop mid-torso, mid-thigh, or mid-shin to maintain the psychological continuity of the human form outside the frame.
Why You Must Crop PNG for Social Media Success
Every social media platform has its own unique layout, aspect ratios, and audience behaviors. What works beautifully as a 16:9 cinematic shot on YouTube will be severely compromised if posted as-is on Instagram. To maximize engagement, you must crop PNG assets specifically tailored to the destination platform.
- Instagram: The platform favors the 1:1 square ratio for standard grid posts, or the 4:5 vertical ratio (1080 x 1350 pixels) to take up maximum screen real estate on mobile devices. When you crop PNG files for Stories or Reels, the required ratio shifts dramatically to 9:16 (1080 x 1920 pixels).
- Facebook: While flexible, Facebook link previews generally look best when cropped to a 1.91:1 ratio (1200 x 630 pixels). Event cover photos and group banners all require precise cropping to prevent vital text or faces from being obscured by UI elements.
- Twitter (X): Twitter feeds tend to compress tall images. To ensure your picture looks great in the feed without requiring the user to tap to expand, crop PNG dimensions to a 16:9 ratio.
- LinkedIn: Professionalism requires perfection. Profile pictures must be cropped tightly as perfect squares (1:1), while background banners require a very wide 4:1 panoramic crop.
By utilizing the pre-set aspect ratio buttons in our web tool above (1:1, 16:9, 4:3), you can perfectly crop PNG files for these platforms in seconds.
SEO and Web Performance: Why Cropping Matters
For website owners, bloggers, and e-commerce managers, the decision to crop PNG files goes far beyond aesthetics; it directly impacts Search Engine Optimization (SEO) and website loading speeds. Search engines like Google prioritize fast-loading, mobile-friendly websites.
When you upload a massive 20-megapixel raw photo straight from a digital camera onto your website, it forces the user's browser to download a huge file, only to shrink it down visually via CSS. This creates massive delays in your Largest Contentful Paint (LCP) metric. By deciding to crop PNG dimensions to the exact pixel size required by your web layout, you drastically reduce the file size. Furthermore, cropping out unnecessary background pixels means compression algorithms can work much more efficiently, yielding a smaller file footprint.
Additionally, cropping allows you to highlight the contextual relevance of a photo. If your article is about "Vintage Coffee Mugs," but your photo shows a whole kitchen with a mug in the corner, search engines (which increasingly use AI to analyze content) might misinterpret the focus. When you crop PNG boundaries closely around the mug, you reinforce the semantic relevance of the visual to the surrounding text, strengthening your overall SEO profile.
The Evolution of Tools to Crop PNG
Historically, to crop a photo meant physically taking a pair of scissors to a printed photograph or using an enlarger in a darkroom to expose only a portion of a negative onto photographic paper. With the advent of digital photography, desktop software like Adobe Photoshop revolutionized the process. However, these tools are often expensive, require significant computing power, and have steep learning curves.
Today, the paradigm has shifted towards browser-based solutions. Web-based applications allow you to crop PNG files on any device—be it a high-end desktop PC, a tablet, or a budget smartphone. The tool provided on this page utilizes advanced JavaScript APIs to bring desktop-class photo manipulation directly to your browser. Because the processing is done client-side, your privacy is maintained; the files aren't uploaded to a distant server to be manipulated, ensuring speed and security.
Furthermore, modern workflows often require batch processing. Being able to load up to 10 PNGs simultaneously, utilizing an intuitive drag-and-drop interface, and swapping between them seamlessly saves tremendous amounts of time compared to opening files one by one.
Common Mistakes to Avoid When You Crop PNG
Even with great tools, human error can result in poor compositions. Here are some pitfalls to avoid when you crop PNG files:
1. Over-Cropping (Pixelation): When you crop too tightly into a low-resolution photo, you stretch a small number of pixels over a large area, resulting in a blurry, blocky, pixelated mess. Always start with the highest resolution file possible. Our tool supports massive files up to 30MB, giving you plenty of data to work with.
2. Losing Context: While removing distractions is good, removing the environment entirely can sometimes rob a photo of its story. If you photograph a mountain climber, cropping out the mountain entirely just leaves you with a person clinging to an ambiguous rock. Balance focus with context.
3. Inconsistent Aspect Ratios on E-commerce: If you run an online store, nothing looks less professional than a product grid where every product shot has a different height and width. When you crop PNG assets for product catalogs, always use a locked aspect ratio (like 1:1 or 4:3) and ensure the product occupies roughly the same percentage of the frame in every shot.
Step-by-Step Guide to Using Our Free Crop PNG Tool
We designed this web application to be as user-friendly as possible, requiring zero technical knowledge. Here is how to achieve the perfect crop:
- Upload Your Files: Locate your PNGs on your computer. You can drag and drop up to 10 files directly into the dashed upload zone, or click the "Browse Files" button. Remember, each file can be up to 30 Megabytes in size.
- Select the PNG: Once uploaded, your images will appear as thumbnails in the gallery below the main workspace. Click on any thumbnail to load it into the main cropper.
- Set Your Ratio: Above the cropper, select your desired aspect ratio. Click "Free" if you want to draw a custom box, or choose predefined ratios like 16:9 or 1:1 for social media perfection.
- Adjust and Frame: Click and drag the corners of the crop box to resize it. Click inside the box and drag to move it around the frame until you achieve the perfect framing using the grid lines.
- Fine-Tune: Use the rotation buttons to fix crooked horizons, or the flip buttons to mirror the photo if the composition demands it.
- Download: Once satisfied, hit the green "Crop & Download" button. The tool will instantly process your crop and save the new, optimized PNG to your device, ready to be shared with the world.
Advanced Considerations: Color Profiles and Formats
While learning to crop PNG visually is step one, understanding what happens under the hood is step two. When manipulating photos for the web, PNG is preferred for images requiring transparency or crisp text and graphics. When you crop and save using our tool, the native browser canvas API handles the pixel rendering, preserving transparent backgrounds and ensuring a clean output.
Always ensure your final cropped PNGs are in the sRGB color space if they are destined for the web, as this is the universal standard for monitors and mobile screens. Cropping an Adobe RGB or ProPhoto RGB photo without converting it first can lead to dull, washed-out colors on your website.
Conclusion
To crop PNG files correctly is to take control of your visual storytelling. It is the easiest, fastest, and most profound way to elevate an average photograph into a striking piece of visual content. By applying the Rule of Thirds, optimizing for specific platforms, and avoiding common resolution pitfalls, you ensure your visuals captivate your audience.
Bookmark this page and utilize our responsive, secure, and lightning-fast crop PNG tool whenever you need to prepare visuals for your website, social media channels, or print projects. With support for multiple large files and an intuitive interface, perfectly composed PNGs are just a few clicks away.